# Blog Components
You can turn any collection of pages in Bootstrap Studio into a functional blog with the help of the built-in Blog components. This page documents the components, their functions and options.
You can see them in action in this lesson.
# Blog Options
A crucial piece of turning pages into blog posts is the Blog Options settings screen that is available in the Properties dialog of each page. You can access it by right clicking a page in the Design panel and choosing Properties, then navigating to the Blog Options section.
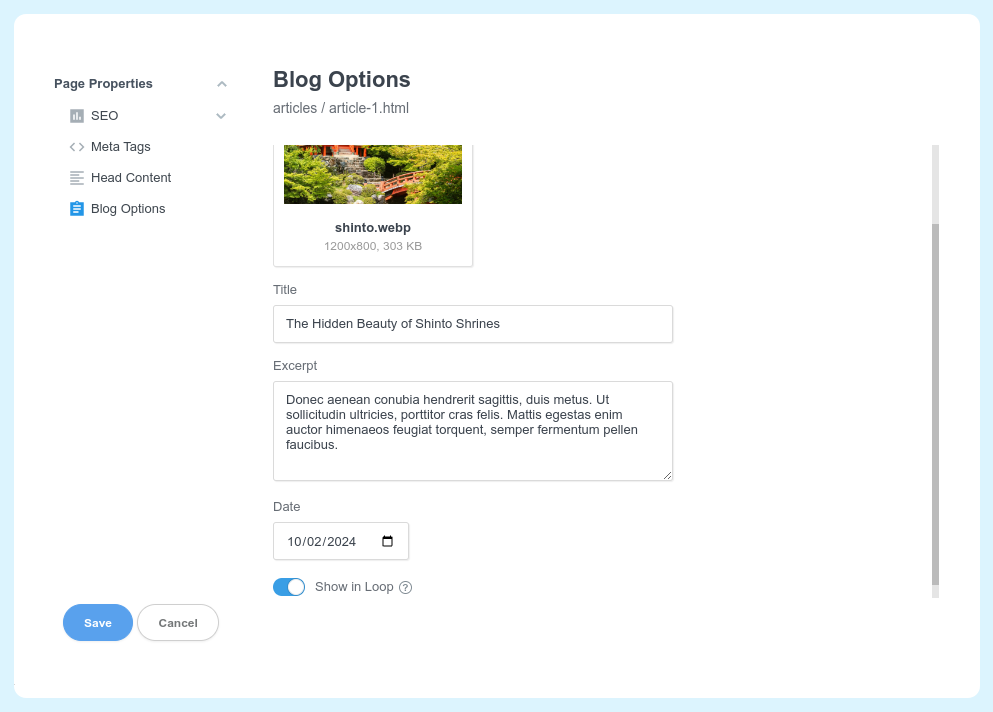
Here you can enter additional data like a blog post image, title, excerpt, publication date, and assign tags and authors, which will be picked up by the blog components listed below.
# Components
You can see the available components in the Blog group, available in the Component panel:

# Blog Loop
The Blog Loop is a powerful component that generates a self-updating list of blog posts from a selected folder of pages in your design.
Note
Although we refer to it as "Blog Loop", it can be used for much more than just blog posts. It gives you full control over each item's HTML, so you can build any type of layout with it. You can create blogs, news sections, portfolios, knowledge bases, web comics, podcast archives and much more.
You can place it on your index page to list all your posts, or beneath each post or in a sidebar as a way to construct a related posts section.
Since Blog Loop embeds the contents of the list as regular HTML code in the page during export, the blog is lightning fast, has perfect SEO, works on any web host, and doesn't require a CMS like WordPress to function.
It has the following options:

- Source: Blog Loop can iterate over posts from a
folder, or a custom list of pages. - Source Folder: Specifies the folder containing the pages to display as blog posts.
- Scan Subfolders: By default the loop will check nested folders within your chosen one for pages. You can turn it off.
- Exclude Current Page: Excludes the current page from being listed in the loop (useful for related post sections).
- Filter by Tag: You can choose to filter the list of posts to include only those that match a specific tag. The special
From URLoption will make it possible for the blog loop to be filterable from a?tag=query parameter in the URL. This is helpful when building dynamic tag pages. - Filter by Author: You can choose to filter the list of posts to include only those that are by a specific author. The special
From URLoption will make it possible for the blog loop to be filterable from a?author=query parameter in the URL. This is helpful when building dynamic author pages. - Order By: Determines the sorting order of posts. Options include:
- Date (Desc): Newest posts first.
- Date (Asc): Oldest posts first.
- Name (Desc): Alphabetical sorting, Z to A.
- Name (Asc): Alphabetical sorting, A to Z.
- Type: Defines how the posts are displayed. It has the following options:
- Default lists each child as a div and gives you complete styling freedom.
- Row makes the loop behave like a Row and the children as Columns so you can make your layout responsive using the Bootstrap grid options.
- Show Pagination: Enables pagination to break posts into multiple pages.
- Per Page: Sets the number of posts displayed per page (e.g., 12).
- Add URL Parameter: Adds the current page number to the URL to support direct links and browser history navigation.
- URL Parameter: Allows you to specify the URL parameter name (default:
page). - Scroll After Change: If you have a long list of posts you may wish to scroll to the top fo the list when the user switches a page. Activate this option to achieve this behavior.
- Manage Empty State: Enable this setting to show an
Empty Statecomponent inside the Blog Loop. This element is displayed whenever the blog loop has no posts to show. You can show/hide the empty state in the app from the toolbar when Blog Loop is selected. Learn more.
# Dynamic Filtering
Blog Loop generates and embeds HTML in the page during export. This makes it work similar to a static site generator. This is great for SEO and means you can manage the content of your website without a CMS.
In some cases dynamic filtering of the Blog Loop results is desirable. For example you may wish to create a tag page, where you show a list of all tags in your design, which when clicked filter the results only to those belonging to the tag.

This is where the From URL options of Filter by Tag and Filter by Author (shown in the previous section) come into play. When enabled, a small JS snippet will be added to the page which will check for the presence of ?tag=<abc> or ?author=<xyz> query parameters in the URL. If such a parameter is present, the results in the loop will be filtered to include only the specified tag or author.
You can learn more in our blog tags and authors guide.
# Empty State
With dynamic filtering enabled, Blog Loop filters its results based on URL query parameters (see above). However, this can lead to situations where no posts match the filter criteria, such as when a user selects a tag or author that doesn't exist or has no associated posts.
In these cases, the Blog Loop would be blank, which is undesirable. To improve this, you can enable the Manage Empty State option in the Blog Loop settings. This allows you to create custom content that will be shown whenever the loop has no results to display, like the following example.

# Blog Post Title
When added to a page, Blog Post Title automatically displays the title set in the Blog Options. If it is added to a loop item within the Blog Loop, it will pull the title from the blog options of the relevant page.
It inherits all the standard Heading options:

# Blog Post Excerpt
When added to a page, Blog Post Excerpt automatically displays the title set in the Blog Options. If it is added to a loop item within the Blog Loop, it will pull the excerpt from the blog options of the relevant page.
It has the standard textual options for a paragraph, plus the Length Limit option, which shortens the excerpt to the specified number of characters.

# Blog Post Image
When added to a page, Blog Post Image automatically displays the cover image set in the Blog Options. If it is added to a loop item within the Blog Loop, it will pull the image from the blog options of the relevant page.
It has the same options as the Image component, with the notable exception of the src property. The source is set automatically.
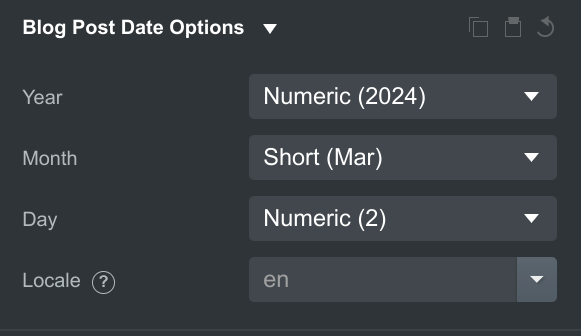
# Blog Post Date
Blog Post Date displays the creation date of the post, as set in the page's Blog Options.
You can customize the format of the date and the locale.
# Blog Post Link
Blog Post Link is a standard hyperlink which always points to the blog post page's URL. This is useful in Blog Loop, where you can make each card, button or heading of a blog post to point to the relevant blog post page.
It has the same options as the Link component, with the notable exception of the href property. The href is set automatically.

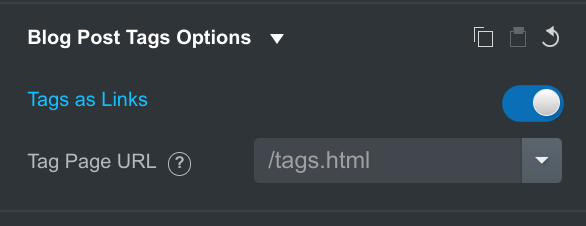
# Blog Post Tags
Blog Post Tags displays all of the tags that have been assigned to the blog post from the Blog Options panel. You can drop this in a loop item or inside a blog page.
By activating the Tags as Links option you can enter the URL of a tag page which the tag will link to. The tag slug will automatically by added as a ?tag=<slug> parameter.
You can learn more in our tags guide.
# Blog Tag Nav
Blog Tag Nav displays all of the tags that exist in your design. Use it to build filterable tag pages or navigation bars. It can't be placed inside a Blog Loop, it needs to be standalone.
It shares most of its options with the regular Nav component, with a few additions:
- Show "All" Tag - displays an "All" tag in the first position. Clicking it allows the user to clear a previously selected tag. You can customize the label of the "All" tag.
- Active Tag From URL - marks the tag who matches the
?tag=<slug>URL as active. If you disable this option you can choose an active tag manually.
If you don't set a Tag Page URL the tags will link to the current page, allowing you to use the Blog Tag Nav as a filtering control for a blog loop.
You can learn more in our tags guide.

# Blog Tag Name
Blog Tag Name displays the name of the tag. It can only be dropped inside a Blog Tag Nav or a Blog Post Tags component. It's a regular text element option-wise and doesn't feature special settings.
# Blog Post Authors
Blog Post Authors displays all of the authors of a blog post. It can be dropped inside a blog loop item or a blog post page.
By activating the Authors as Links option you can enter the URL of a author page which the author will link to. The author slug will automatically by added as a ?author=<slug> parameter.
You can learn more in our authors guide.

# Blog Authors
Blog Authors displays a list of all authors that have been configured in your blog. You can also limit it to show only a specific author. It cannot be dropped inside a blog loop item, it needs to be standalone.
You can also activate an option to take the author to show from the URL by looking for a ?author=<slug> query parameter. This is useful when building author pages.
You can learn more in our authors guide.

# Blog Author Name
Blog Author Name displays the name of the author. It can only be dropped inside a Blog Post Authors component. It's a regular text element option-wise and doesn't feature special settings.
# Blog Author Image
Blog Author Image is an Image component which displays the image that was chosen when creating the author in Settings > Blog. This component can only be dropped inside Blog Post Authors
It has the same options as the Image component, with the notable exception of the src property. The source is set automatically.
# Blog Author Bio
Blog Author Bio displays the bio of the author, as entered in Settings > Blog. It can only be dropped inside a Blog Post Authors component.
In terms of options, it supports the same settings as the paragraph component. The only notable addition is the Length setting which allows you to limit the number of characters that are displayed from the bio.